The Project Inspector
The Project inspector holds tools related to attributes of the project as a whole, including summary information and details about the project’s structure and chronological flow.

Title
Use the Title field at the top of the inspector to set the name or title of your project. By default the project title is the same as the document name, but it doesn’t have to be; changing the project title doesn’t rename the document, and vice versa.

The project title is used when generating reports with OmniPlan Pro.
Timeline
Use the Timeline inspector to set the project direction and dates for scheduling project tasks.
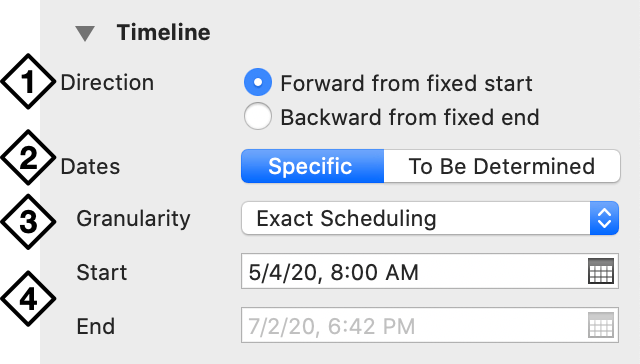
- Direction—Choose whether the project is scheduled forward from a fixed start, with tasks scheduled as soon as possible, or backward from a fixed end, with tasks scheduled as late as possible.
- Dates—Choose whether project dates are specific or to be determined. Until a project uses specific dates, dates in date headers are expressed as T day (the present day), T+1d, T+2d, and so on.
- Granularity—Choose whether tasks are scheduled exactly down to the minute, rounded to the nearest hour, or the nearest day.
- Start Date, End Date—For projects with specific dates, enter the project start date (for projects with fixed start dates) or the project end date (for projects with fixed end dates).
Summary
Use the Summary inspector to view collected information about the project that is gathered as totals from the tasks within the project. Values in this inspector cannot be edited directly.
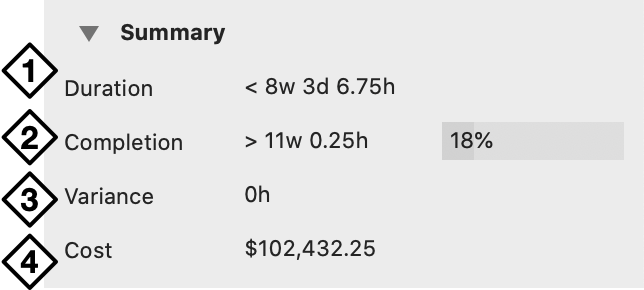
- Duration—The total projected duration for the project.
- Completion—The total completion percentage for the project, calculated as a sum of the total effort completed compared to the total effort required for the project to finish.
- Variance—If a baseline has been set, displays the project’s actual end date’s deviation from the end date in the currently selected baseline.
- Cost: The total cost for the project. This includes hourly resource costs, task costs, equipment or goods required to complete the project, and so on. If, during the course of your project, additional costs are incurred, this value updates automatically so that it always reflects the current total cost of the project.
Depending on how you have chosen to view duration and effort in the Formats inspector, you may see a greater than (>) or less than (<) symbol next to the Duration, Effort, and Variance fields. These symbols are used to denote when a figure has been rounded up or down, respectively. If you need a more precise view of a project’s duration and effort, try turning on the minutes option in the Formats inspector.
The information shown in the Summary inspector is based on the currently selected baseline, or the actual schedule if no baseline is set.
Formats
Use the Formats inspector to define how your project displays units of time and currency.

-
Currency—Choose a standard currency format from the dropdown list, or type the currency symbol of your choice and the field will auto-fill with the appropriate format.
-
Dates—Choose whether to include seconds, the time of day, or both in your displayed dates. Note that this doesn’t affect task scheduling or durations; only how dates are displayed in locations they appear across your project.
-
Effort, Duration—Choose the time units used to display durations and amounts of effort.
Note that, in duration fields, if you enter a number without any units, OmniPlan assumes the smallest unit here. Units of time (Duration and effort) are designated throughout OmniPlan with the following abbreviations:
- s = second
- m = minute
- h = hour
- d = day
- w = week
- mo = month
- y = year
If a value contains a unit of time that is too small to be displayed, you may see a rounded value. For example, if you have turned off the display of minutes in the Formats section of the Project inspector, and you have a task that starts at 9:00 and ends at 9:55, the value you see is < 1h. If you want to know the actual value, you can turn on the smaller units in Formats section, or check the start and end times of the task. If you want to edit the value to conform to your units, you can delete the greater-than or less-than sign and the value updates.
Effort Unit Conversions
Use the Effort Unit Conversions inspector to customize your project’s standard units of work-per-time.
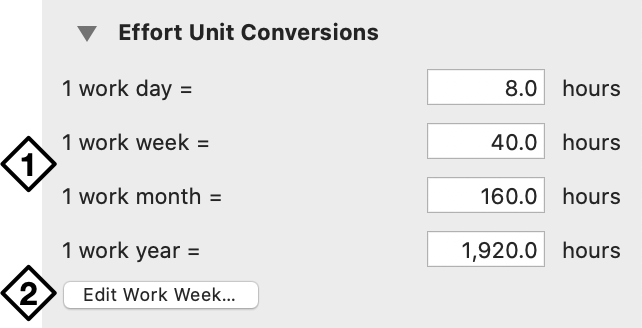
-
Conversion Factors—Your work day may be any number of hours. These conversion factors determine how hours add up into the larger units.
-
Edit Work Week—Click to open the Normal Hours tab in Resource View for editing the project calendar’s work week.
To reiterate: effort conversion factors don’t change the working hours for the project, only the way durations are entered and displayed. To change working hours for the project, visit Resource View to edit the project’s normal hours.
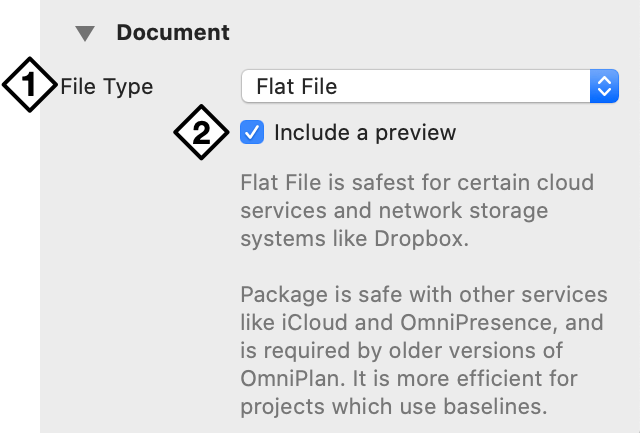
Document
Use the Document inspector to choose a file type for the project file, and decide whether to generate a preview of the document when saving.
In a new document this inspector is collapsed by default; click the disclosure triangle to the left of the inspector name to reveal its contents.
-
File Type—Use the popup menu to choose whether to save the project as a flat file—the default file type, ideal for greatest compatibility with cloud sync and storage—or a package—an older file type compatible with previous versions of OmniPlan.
The package file type can improve performance in some cases, but unless you have a specific need for it, the flat file type is otherwise recommended.
-
Include A Preview—Select to create a Quick Look preview of your document when you save the project.
On most modern Macs this process will not noticeably impact your use of the app, but if you encounter performance issues when saving, turning off Quick Look previews may improve the experience.