Outline View
Outline View provides a representation of your project as a hierarchical list of tasks. Each task is represented by a row, with corresponding columns that contain specific types of information related to the tasks in your project.


This view is ideal for quickly creating a project by entering the tasks it contains, adding the relevant information in customizable columns, and once the project is up and running, getting a data-rich spreadsheet-style overview of the project’s progress.
To switch to Outline View, tap  in the view switcher.
Creating and Deleting Tasks
As you begin building a project, rapidly creating new tasks and milestones (and removing extraneous ones) are key parts of the process, and Outline View is perfect for the purpose.
There are several ways to create new items in the outline:
- Tap New Item
 in the document toolbar to add a task. Touch and hold to open a menu with options for adding a milestone or group instead.
 - Touch and hold an empty space in the outline to open a contextual menu with the Add New Task command.
- Press return on an external keyboard to add a task. The new task appears beneath the currently selected task, or at the end of the outline when no task is selected.
There are a few ways to delete a task, milestone, or group:
- Tap Select in the document toolbar to enter Selection Mode, then tap the item rows you want to delete. Choose Delete from the bottom bar to delete them all at once.
- Tap to select an item, then touch an hold it to open its contextual menu where the Delete command appears.
- Press delete on an external keyboard to delete a selected item.
If you are publishing and subscribing with OmniPlan Pro, new tasks and changes can come from other users of the project. Use the change tracking feature to accept or reject these changes.
Hierarchy and Task Groups
When initially creating a project, tasks can be organized in a flat list with each task a peer of every other. However, it can be useful to group tasks into hierarchical arrangements to better represent their relationships.
Note that hierarchical relationships—the arrangement of tasks into groups—are distinct from dependency relationships, which describe the order in which tasks must be completed.
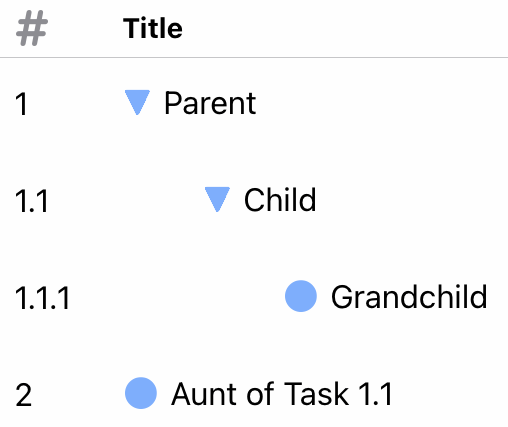
Tasks are represented in the Title column by their name, and is additionally designated by number in the Task Number column. Tasks at the top of the hierarchy are represented by integers, while tasks at lower levels have points appended to them for each level of hierarchy below the top. The first child of Task 1 will be Task 1.1, the first child of Task 1.1 will be Task 1.1.1, and so on.
To represent task numbering as a flat list of integers without taking hierarchy into account, open the Task Numbers submenu in the Formats and Conversions section of the Project inspector and choose Flat Numbering.
When a task gains its first child task it is converted to a group task, and takes properties unique to to the group task type.
There are a few ways to approach grouping, depending on whether you are starting with an existing set of items you want to add to a group, converting an existing item to a group, or creating a brand new group task.
-
To convert a task to a group and add child tasks inside it:
- Select the item you want to grant sub-tasks.
- Open the Task inspector and change the Task Type to Group.
- Tap the disclosure triangle on the task row to open the group, then tap the row to select it.
- Add tasks to the group by tapping New Item or pressing return on an external keyboard.
-
To bring tasks into a group within another task in the outline:
- Tap Select to enter Selection Mode. Select the items to be grouped.
- Tap Move in the bottom bar, and tap the destination item to open its contextual menu. Choose Inside.
- The items become children of the destination item, which becomes a group (if it wasn't one already).
-
To create a new group with selected tasks inside it:
- Tap Select to enter Selection Mode. Select the items to be grouped.
- Tap Group in the bottom bar.
- The selected items become children of a newly created group task.
-
To create a new group with nothing inside it:
- Touch and hold New Item to open its popover menu.
- Choose Group from the menu.
- A new, empty group item is created.
- To add items inside the group, open it by tapping the disclosure triangle next to the group name, and with the group selected, create new tasks as normal.
- Touch and hold New Item
Characteristics of Group Tasks
A group determines most of its characteristics from the tasks it contains, rather than having characteristics of its own. A group’s characteristics can be viewed (and in some cases defined) in the Task inspector.
- Name—A group task has its own name.
- Type—A group task can contain tasks, milestones, and other groups, but its own type is always group. (An empty group has no effort or duration and can serve as a placeholder.)
- Effort—The effort of a group is the sum of the effort of all tasks it contains.
- Duration—The duration of a group is the amount of time between the beginning of its first task and the end of its last task, not the sum of the durations of all its tasks. If a group contains three one-hour tasks all happening at the same time, the group has a duration of one hour, not three hours.
- Scheduling—A group can have start and end constraints, which can then affect the dates of tasks inside it. Group tasks cannot have manually scheduled start or end dates themselves.
- Dependencies—A group can have dependencies just like a regular task.
- Resource Assignments—If you assign a resource to a group task, the resource gets assigned to all tasks in the group. The group itself can’t have any resources assigned.
Configuring the Outline
You can customize the outline in Outline View to display a set of columns with data specifically relevant to your project. Touch and hold the outline header to open its contextual menu for choosing choose which columns to display.
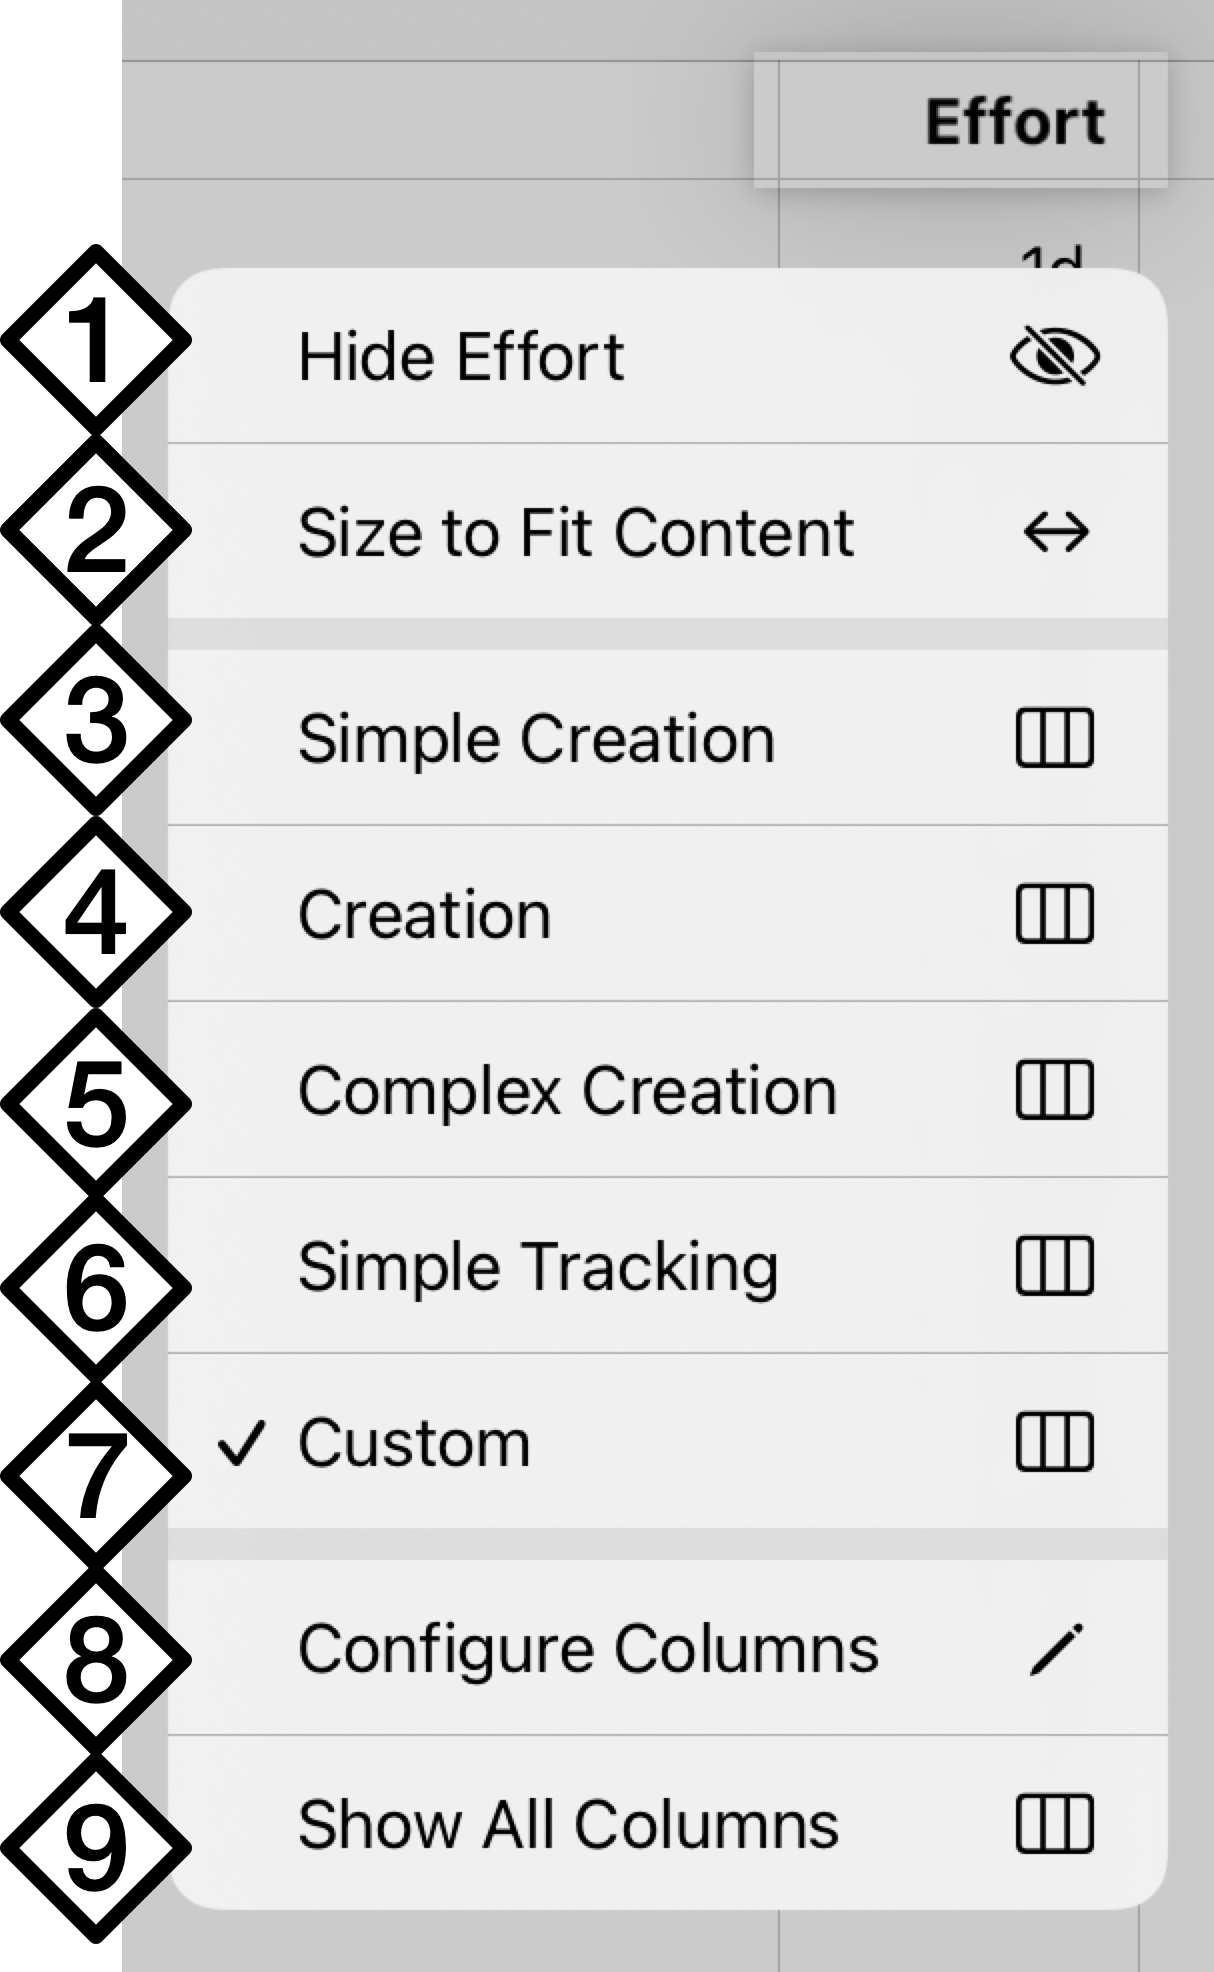
- Hide Column—Hide the selected column (if opening the menu from a specific column).
- Size to Fit Content—Resize the selected column to the width of its widest content.
- Simple Creation—A preset selection of columns useful when rapidly building a new project. Adds the Effort Required column to the base set of Title, Note, and Violation columns.
- Creation—A preset selection of columns useful when building a new project. Adds the Effort Required, Start Date, Prerequisites, and Assigned Resources columns.
- Complex Creation—A preset selection of columns useful when adding detail to a project. Adds the Effort Required, Start Date, End Date, Prerequisites, Assigned Resources, Task Cost, Start No Earlier Than, and End No Later Than columns.
- Simple Tracking—A preset selection of columns useful when tracking project progress. Adds the Status, Effort Required, and Effort Completed (%) columns.
- Custom—Indicates the use of a selection of columns other than one of the presets.
- Configure Columns—Opens the column selection menu for choosing the columns to display in the outline.
- Show All Columns—Turns on the display of every available column.
Data in the these columns corresponds to task rows in the outline. Some column values (such as Duration and Effort Required) can be edited directly in the outline; others (such as Total Task Cost) are calculated automatically. Generally, values you can edit in the outline correspond to editable fields in the Task and Resources inspectors.
With an external keyboard connected, use tab and shift-tab to move between editable cells.
Drag column titles left and right to rearrange the columns.
Basic Columns
The following columns represent basic properties of tasks, as well as information related to the structure and status of the project.
Violations
This column displays an icon for each task that has a violation. Tap the icon to summon the Violations menu and see what the problem is.
Status
This column shows alarm clock icons for tasks that are incomplete and due in the next few days, or in the past. Note that these icons won’t appear if your project has a To Be Determined start date. Each icon color has a meaning:
- Almost due (green): this task is incomplete and due in the next 3 work days.
- Due (yellow): this task is incomplete and due in the next work day.
- Past due (red): this task is incomplete and past due.
Notes
This column indicates whether the task has a note associated with it. Tap the note icon on a selected row to open its note in the Task Info pane of the Task inspector for editing.
Task Type
This column displays an icon based on the the task's type: Task ![]() , Milestone
, Milestone ![]() , Group
, Group ![]() , Hammock
, Hammock ![]() , Split
, Split ![]() , or Recurring
, or Recurring ![]() .
.
Task Number
This column displays the task's number. This is either based on its position in the task hierarchy or a flat integer corresponding to its row, based on the Task Numbers setting in the Formats and Conversions section of the Project inspector.
Task Title
The title of the task.
Effort and Resources Columns
The following columns represent the effort required by tasks and the resources assigned to them.
Effort Required
The amount of total effort the task takes to complete.
Assigned Resources
A list of the resources that are assigned to the task.
Effort Completed (%)
The amount of work that has been completed on the task, expressed as a percentage.
Effort Done
The amount of effort completed on the task, expressed in time increments.
Remaining Effort
The amount of effort remaining before the task is completed, expressed in time increments.
Duration
The task duration.
Scheduling Columns
The following columns represent the time-based properties and constraints of tasks.
Start Date
The actual start time for the task, as determined automatically by leveling or set manually in the Scheduling pane of the Task inspector.
End Date
The actual end time for the task, as determined automatically by leveling or set manually in the Scheduling pane of the Task inspector.
Start No Earlier Than
The task’s Start No Earlier Than constraint, if any. Set in the Constraints section of the Task inspector's Scheduling pane.
Start No Later Than
The task’s Start No Later Than constraint, if any. Set in the Constraints section of the Task inspector's Scheduling pane.
End No Earlier Than
The task’s End No Earlier Than constraint, if any. Set in the Constraints section of the Task inspector's Scheduling pane.
End No Later Than
The task’s End No Later Than constraint, if any. Set in the Constraints section of the Task inspector's Scheduling pane.
Priority
The task's relative priority. During leveling, if two tasks are assigned to one resource at the same time, the task with higher priority (expressed as a larger positive number) gets to use the resource first. Set in the Task inspector's Assignments pane.
Prerequisites
A list of the tasks, by number, that the task relies on in some way (as indicated by the dependency type code).
Dependents
A list of the tasks, by number, that rely on this task in some way (as indicated by the dependency type code).
Free Slack
Slack between an individual task and its subsequent tasks. This value cannot be edited directly.
Total Slack
Total slack refers to the time before an individual task would have an effect on the duration of the project as a whole. This value cannot be edited directly.
Cost Columns
The following columns represent the various costs associated with tasks.
Task Cost
Any costs associated with completing the task other than the cost of the resources assigned to work on it. Set in the Task inspector's Task Info pane.
Cost of Resources
The cost of the resources assigned to the task. This value cannot be edited directly (edit the individual resource costs or change the resource assignments instead).
Total Task Cost
The task cost plus the resources cost.
Monte Carlo Estimation Columns (Pro)
The following columns contain effort estimate data used when simulating milestone completion estimates.
Min Effort Estimate (Pro)
The minimum amount of effort that you estimate the task will take. This value can be set automatically using the Project inspector's Monte Carlo menu.
Expected Effort Estimate (Pro)
The amount of effort that you expect the task will take. By default this is equal to the task’s actual effort.
Max Effort Estimate (Pro)
The maximum amount of effort that you estimate the task will take. This value can be set automatically using the Project inspector's Monte Carlo menu.
Advanced Columns
The following columns represent less frequently used task metadata.
Hierarchical Title
The title of the task, preceded by the title of each task above it in the hierarchy, with each title separated by a colon.
Unique ID
The unique ID is a number assigned to each task that identifies it unambiguously, even if its name or position in the outline changes. A unique ID won’t ever change, and each new task or resource you create gets a new unique ID number. These numbers are useful for matching up items when you are sharing and exporting projects between OmniPlan and other applications.