The Task Inspector
The Task inspector holds tools for configuring selected tasks, including descriptive details and information about their scheduling, dependencies, and assigned resources.

The Task Inspector has the following three panes:
- Task Info—Contains tools for setting details of tasks.
- Scheduling—Enables you to set scheduling influences and constraints on the task.
- Assignments—Set the resources assigned to the task.
Each pane of the Task inspector is covered in the following sections.
Task Info
The Task Info pane of the Task inspector provides settings for describing the parameters of the task, including its name, note, type, amount of effort or duration required to complete, and its visual appearance across OmniPlan's views.
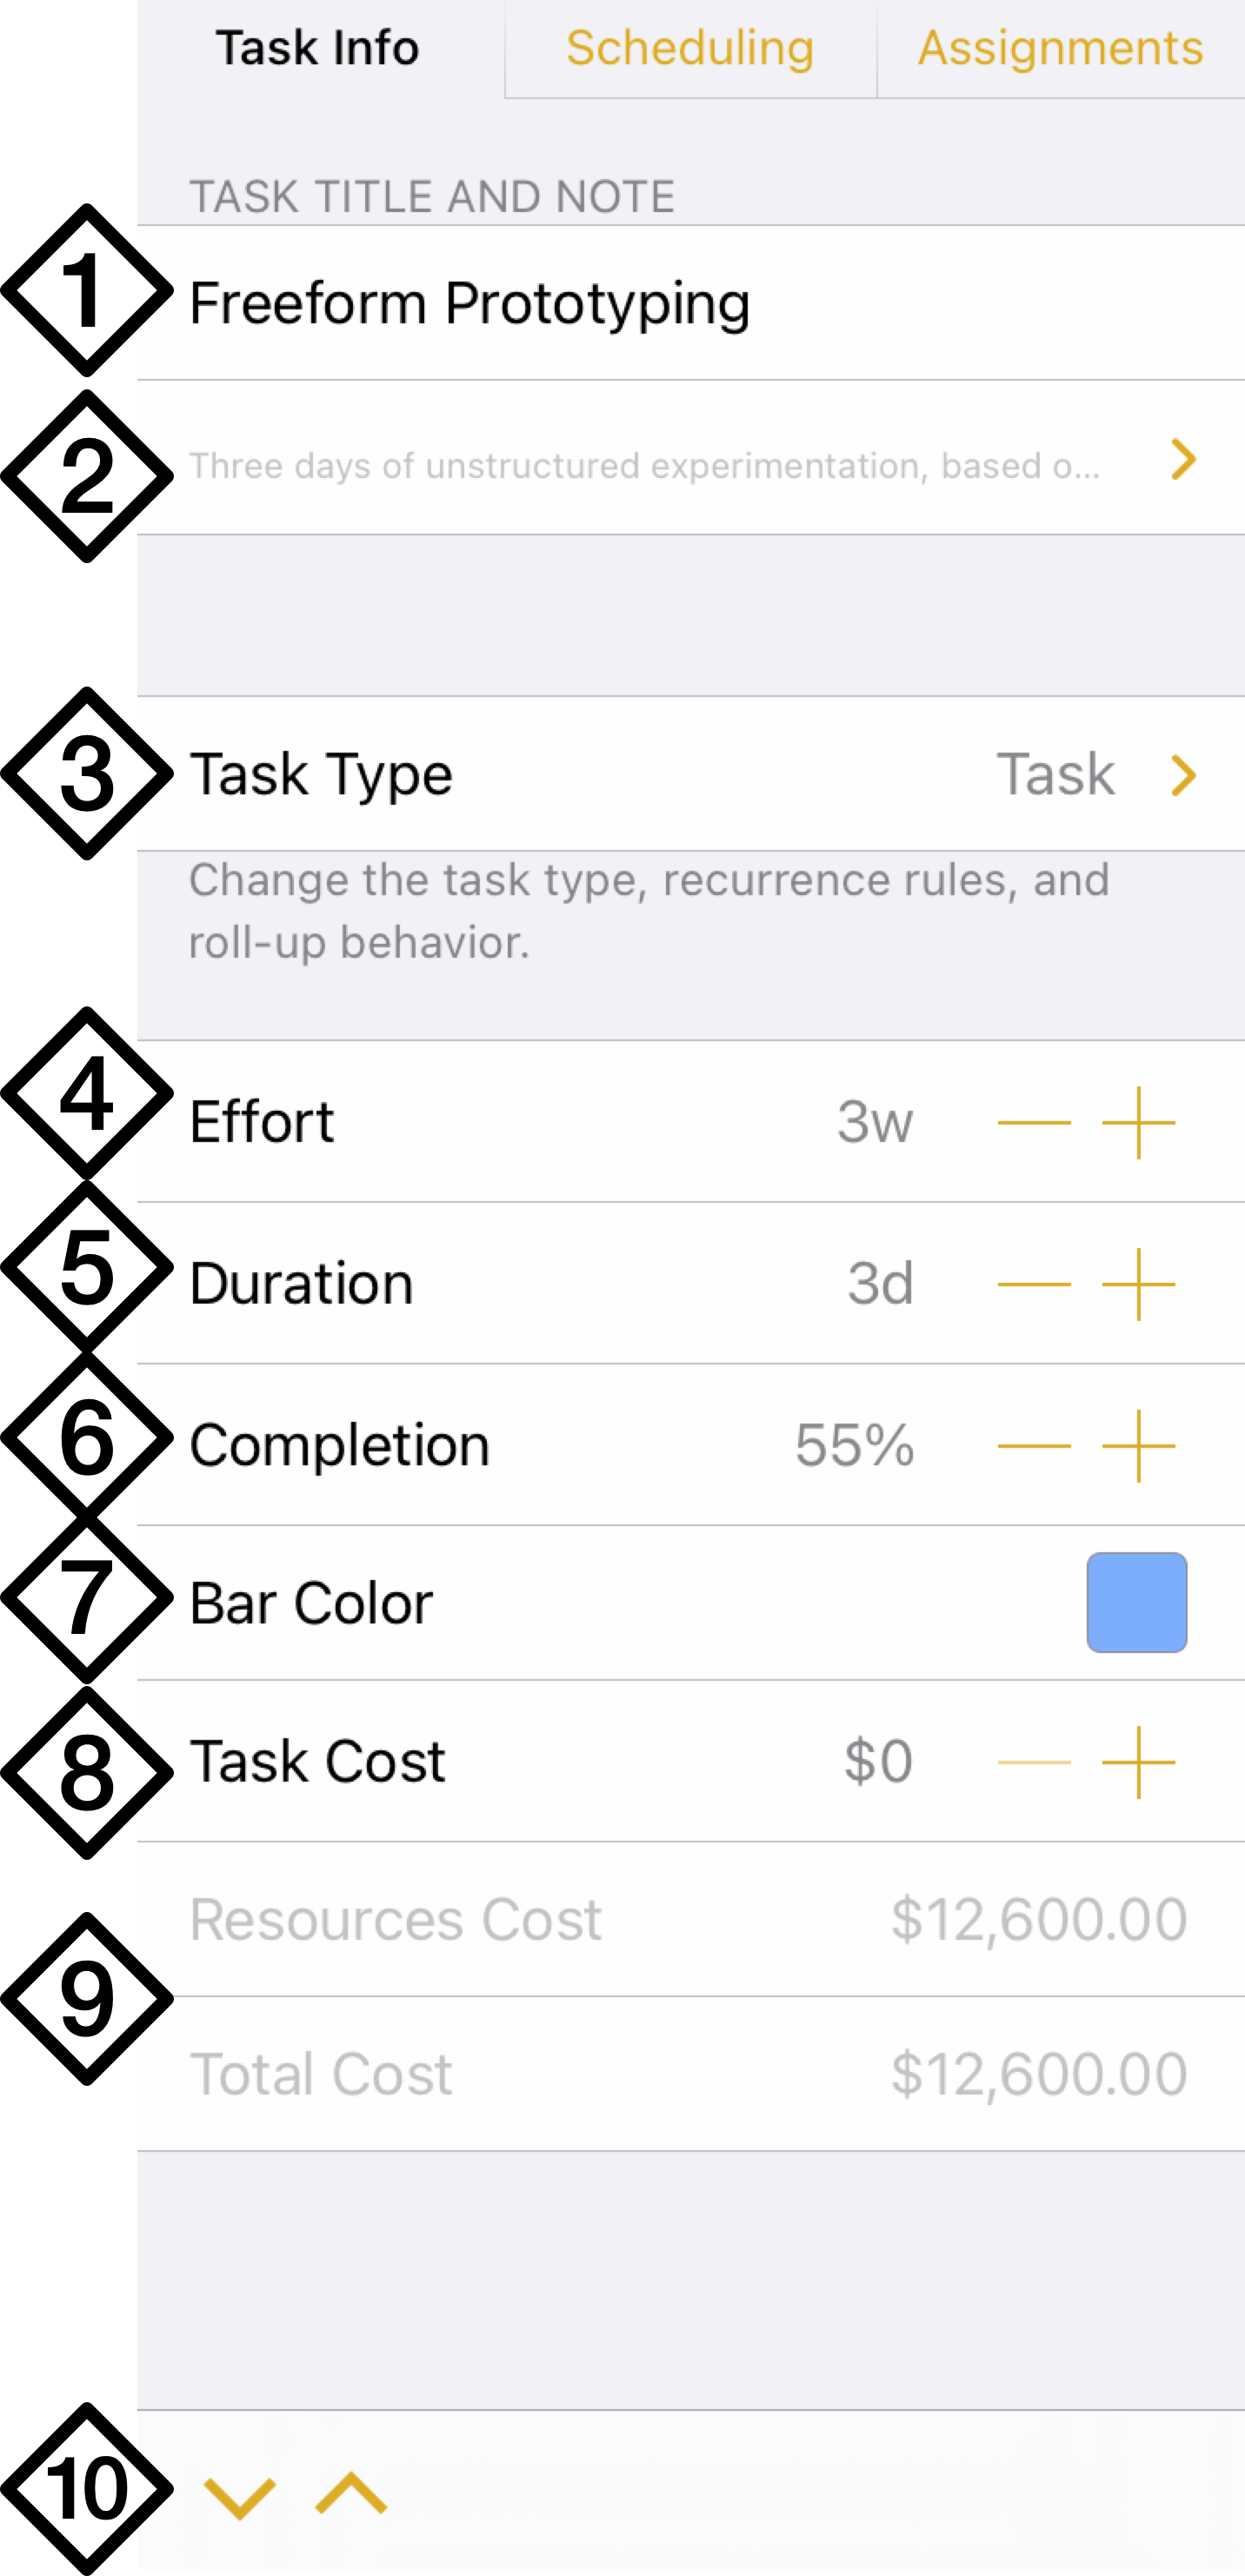
- Task Title—Edit the task’s name.
- Note—Enter a note for the selected task.
- Task Type—Choose a type for the task: Task, Milestone, Group, or Hammock. Set up rules for recurring tasks, and if the task is a group, choose its appearance when closed.
- Effort—The amount of work hours required to complete the task. This value may be automatically adjusted based on the When Assignments Change setting in the Assignments pane.
- Duration—The length in actual time required to complete the task, based on the amount of effort assigned to it. This value may be automatically adjusted based on the When Assignments Change setting in the Assignments pane.
- Completion—The amount of work on the task that is currently complete, expressed as a percentage.
- Bar Color—Choose the color for the task bar as it appears across OmniPlan's views.
- Task Cost—The cost of the task, in addition to the cost/hour or cost/use of any resources assigned to it. Expressed in the units of currency set up in the Project inspector.
- Resources Cost, Total Cost—These values are not edited directly, but represent the total cost of the resources currently assigned to the project, plus the task cost.
- Task Switcher—Use the up and down arrows to move between tasks in the current view while keeping the Task inspector open.
When entering task metadata, such as durations and times, the attributes of the task determine its scope, progress, cost, and visual presentation. Units of time (such as Effort and Duration) are designated in OmniPlan with the following abbreviations:
- s = second
- m = minute
- h = hour
- d = day
- w = week
- mo = month
- y = year
Creating Tasks with an Elapsed Duration
By default, OmniPlan calculates task duration and lead/lag time from the project’s work hours. Entering an “e” before the value for Duration converts it to an elapsed time value instead.
For example, if you need to wait for the paint to dry before you can take the next step in your project, enter 48eh in the “Let paint dry” task’s duration field to tell OmniPlan that the next dependent task can begin Monday morning if the paint has started to dry by the end of the day on Friday.
Tasks with an elapsed time most likely won’t require a resource, since you wouldn’t need to assign someone to stand around and watch the paint dry.
Scheduling
The Scheduling pane of the Task inspector describes how the task is contextually integrated into the project. It lists other factors influencing when the task is allowed to begin, provides controls for locking the task at a point in the project’s calendar, and shows any other tasks that are dependent on the tasks completion to begin.
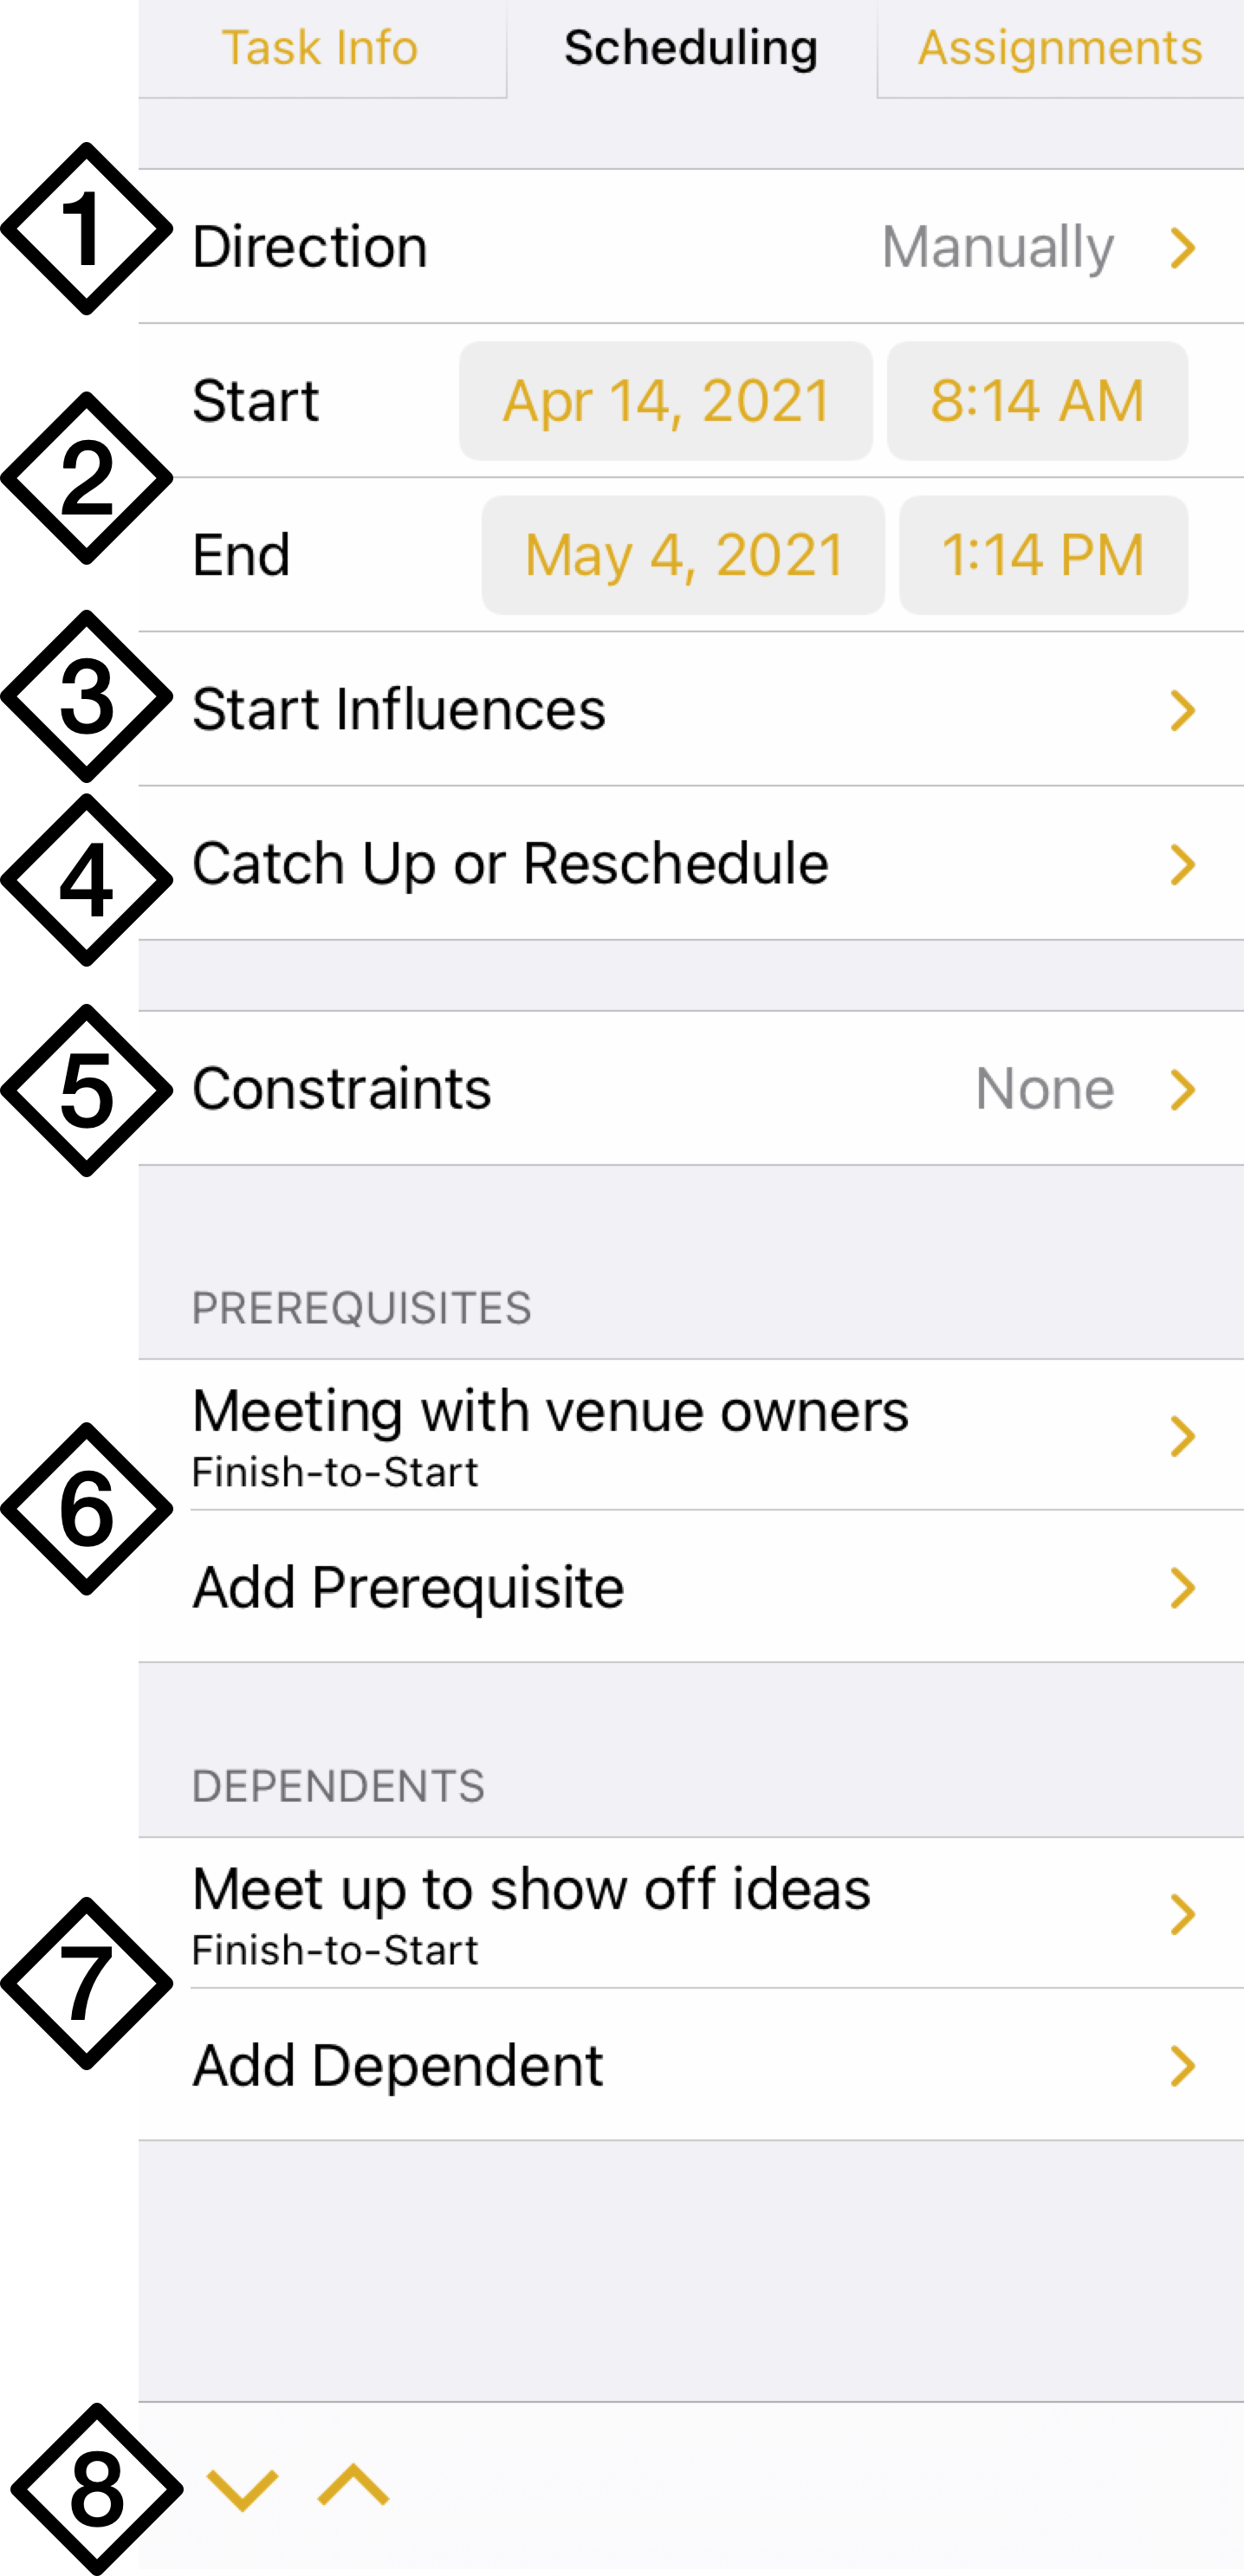
- Direction—Choose whether the task should be scheduled Automatically, based on the leveling needs of the project, or Manually, with start and end constraints that you choose. Automatically scheduled tasks are scheduled either as soon as possible (ASAP) or as late as possible (ALAP), which overrides the Direction setting in the Project inspector for this individual task.
- Start, End—Set the start and end times for manually scheduled tasks. These cannot be edited for tasks scheduled automatically.
- Start Influences—This section lists other aspects of the project that affect when the task can be scheduled, such as the project’s overall start date or the date a task group containing the task can begin. This becomes End Influences for tasks scheduled ALAP.
- Catch Up or Reschedule—Use these controls to update the task based on its current status: either catching up the completion percentage to the planned amount, or rescheduling remaining work for the following day.
- Constraints—Use this submenu to add timing constraints to the task from among: Start No Earlier Than, End No Earlier Than, Start No Later Than, and End No Later Than. Each task can have a single start constraint and a single end constraint; a summary of any constraints is shown on the row in the Scheduling pane.
- Prerequisites—This section lists any tasks that must be completed before for the selected task can begin, along with their details. Tap to edit an existing prerequisite or add lead time, or tap Add Prerequisite to choose a task from the list and create a Finish-Start dependency between that task and the one currently being edited.
- Dependents—This section lists any tasks that rely on this task being completed to begin, along with their details. Tap to edit an existing dependent or add lead time, or tap Add Dependent to choose a task from the list and create a Finish-Start dependency between the current task and the chosen one.
- Task Switcher—Use the up and down arrows to move between tasks in the current view while keeping the Task inspector open.
Assignments
The Assignments pane of the Task inspector controls how the task should be prioritized when leveling, and provides tools for assigning and configuring resources assigned to the task.
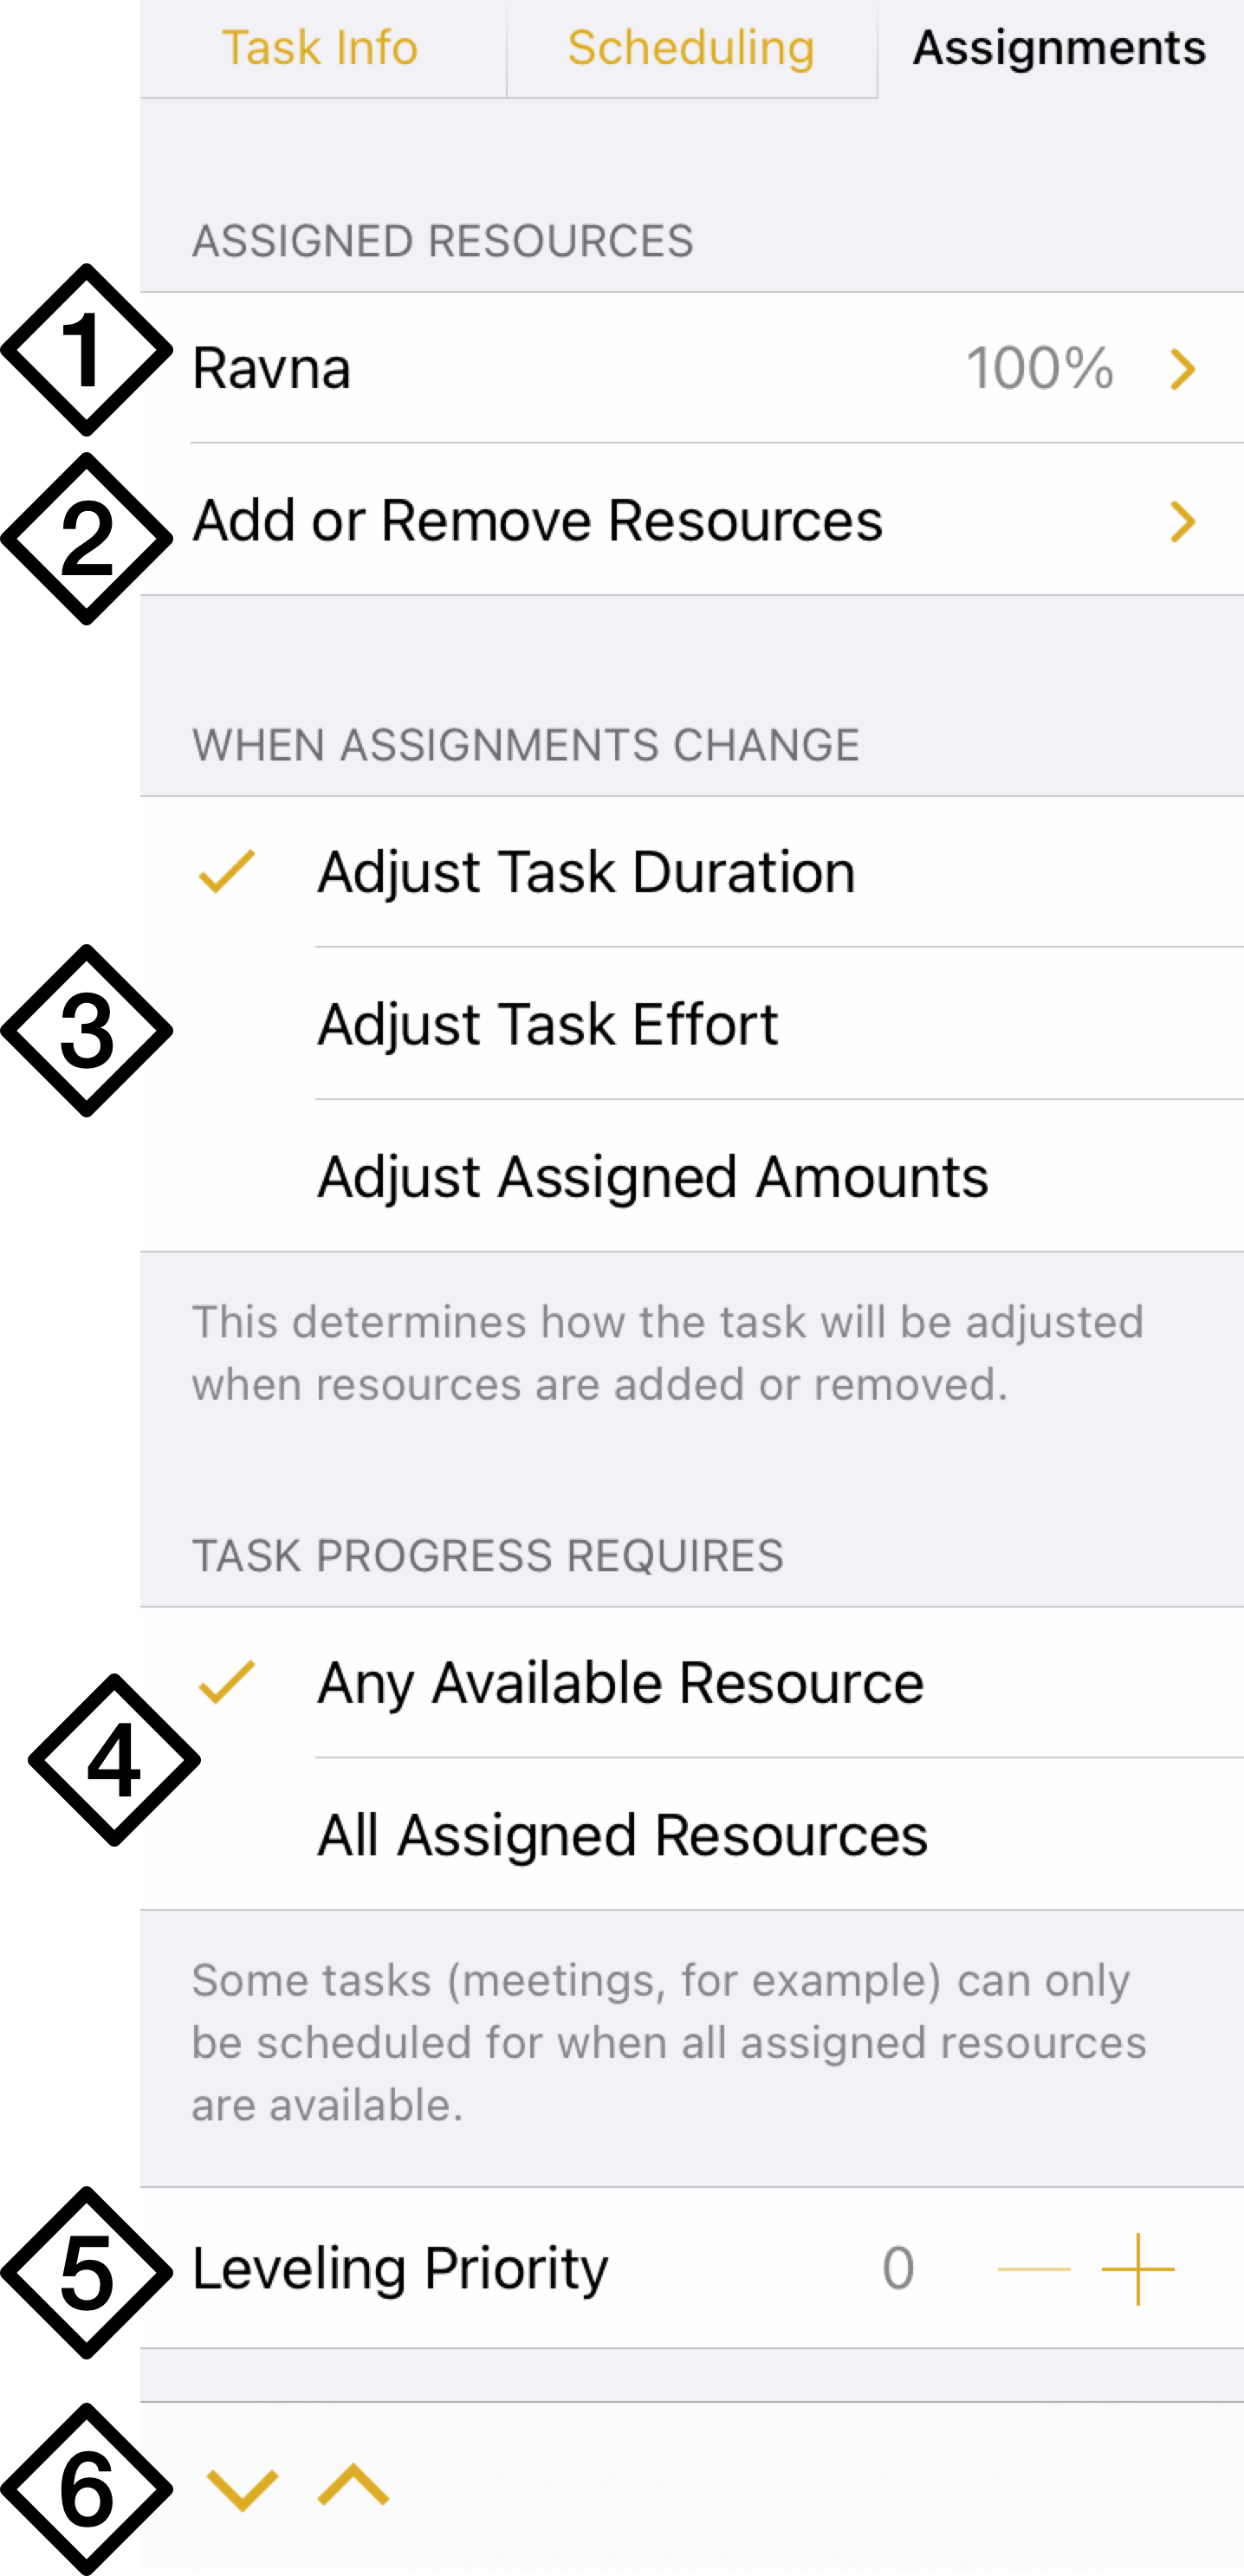
- Assigned Resources—A list of the resources assigned to the task appears here, along with the percentage of their units (or effort) assigned to the task. Tap to change the percentage of assigned units, and see other details of the resulting effort and cost expenditure.
- Add or Remove Resources—Tap to view a list of resources assigned to the project. Resources with a check mark are assigned to the current task; tap each resource to remove or assign it.
- When Assignments Change—Pick from among the following behaviors when resources are added to or removed from the task:
- Adjust Task Duration—Adding new resources increases the effort available to complete them, and this option uses that effort to shorten the amount of time the task will take to complete. The opposite is also true, as removing a resource from the task will increase its duration.
- Adjust Task Effort—Adding new resources keeps the duration the same, and adds the effort they contribute to the total required to complete the task—this represents pouring work into a fixed timeframe. Removing resources indicates that less effort is needed to complete the task in the same amount of time as originally planned.
- Adjust Assigned Amounts—With this option the duration and effort stay the same regardless of resource assignments. Instead, when new resources are added, the amount of effort asked of each resource is reduced evenly across the board (one resource contributes 100 percent, two resources contribute 50 percent each, and so on).
- Task Progress Requires—Choose whether work on the task requires Any Available Resource to proceed, or All Assigned Resources. The latter is particularly useful for planning meetings or other pieces of work where all team members must be present.
- Leveling Priority—When leveling, tasks with no constraints or dependencies are queued based on their order in the Gantt chart unless they are given a priority here. The highest priority task is the one with the largest numerical integer assigned. Priority descends from the largest integer, and negative integers are of lower priority than positive.
- Task Switcher—Use the up and down arrows to move between tasks in the current view while keeping the Task inspector open.
Task Types
OmniPlan supports the following task types, each with their own unique properties.
- Task—The standard representation of a piece of work to be accomplished as part of the project. All tasks require some amount of effort and time to complete.
- Milestone—A task with no effort or duration that represents an important moment in the project’s life. Milestones are used when charting critical paths and in Monte Carlo simulations (Pro).
- Group—A parent task used for creating hierarchy with child tasks within it. Groups have no duration or effort themselves, instead having properties inherited from the tasks they contain.
- Hammock—A special type of task whose duration varies based on the completion of the preceding task and the start of the task that follows. See Creating Hammock Tasks below.
There are two additional task types that are variations on a standard task: Split tasks, which are tasks that include periods of non-working time, and Recurring tasks, which repeat at regular intervals.
Creating Hammock Tasks
A hammock task is one in which the duration is dependent on both when the previous task ends, and the next task starts. This type of task is useful when facing a hard deadline and deciding what can be compressed if the project is running behind schedule, or if external factors influence when parts of the project must happen.
For example, if you were to prepare a written document, the time allotted for editing would vary depending on the completion of the document and its due date.
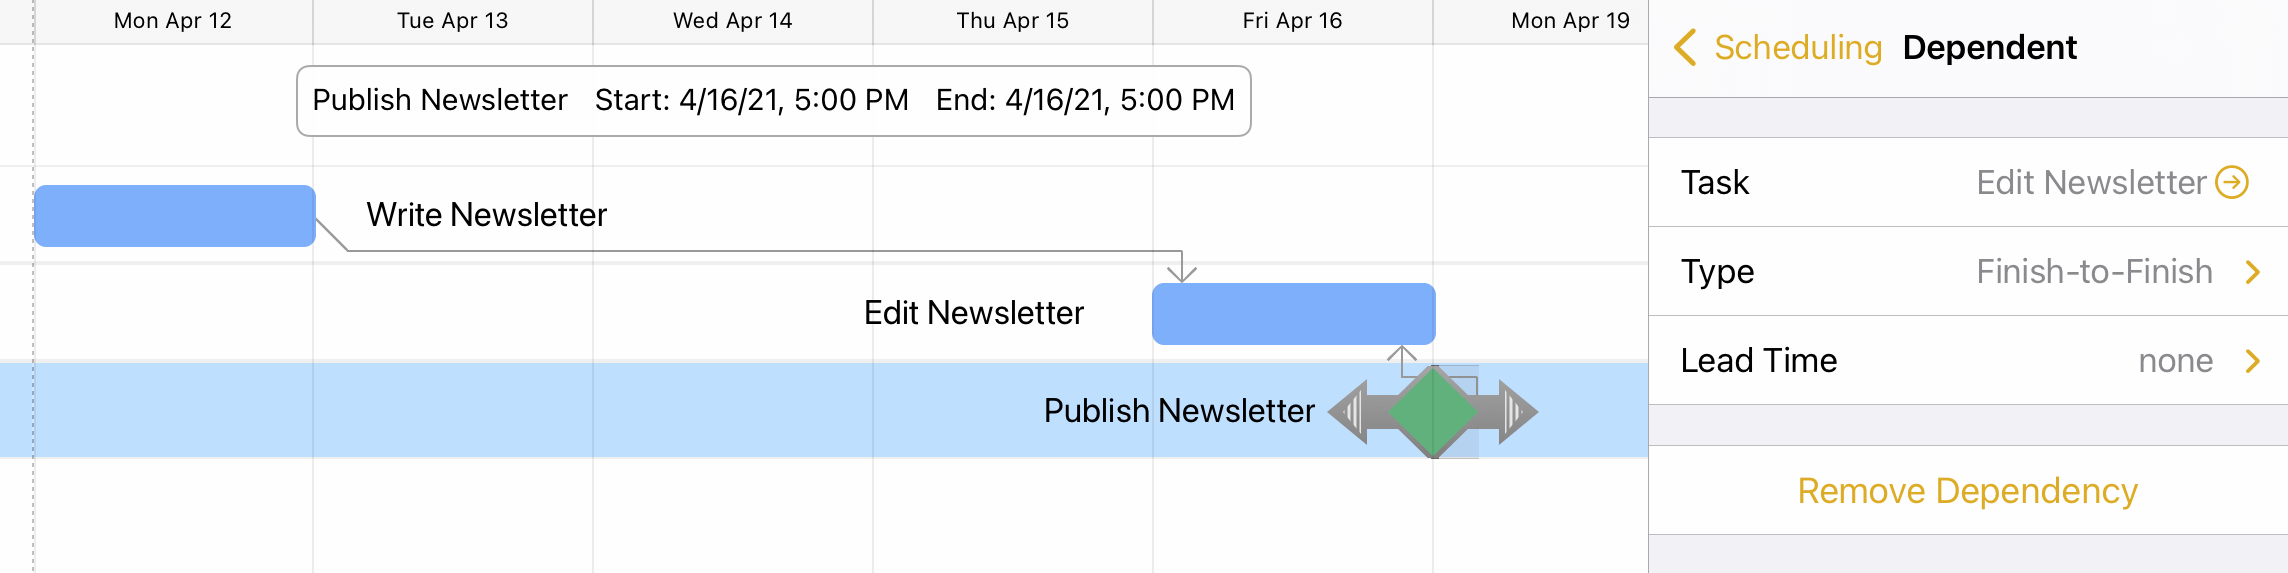
Using that scenario, let’s create an example hammock task. Our starting point is a set of two tasks and a milestone connected by Finish > Start dependencies: Write Newsletter, Edit Newsletter, and Publish Newsletter.

We want to publish the newsletter on April 19th, so we set the Start No Earlier Than date of the milestone to the end of the previous workday (April 16th).
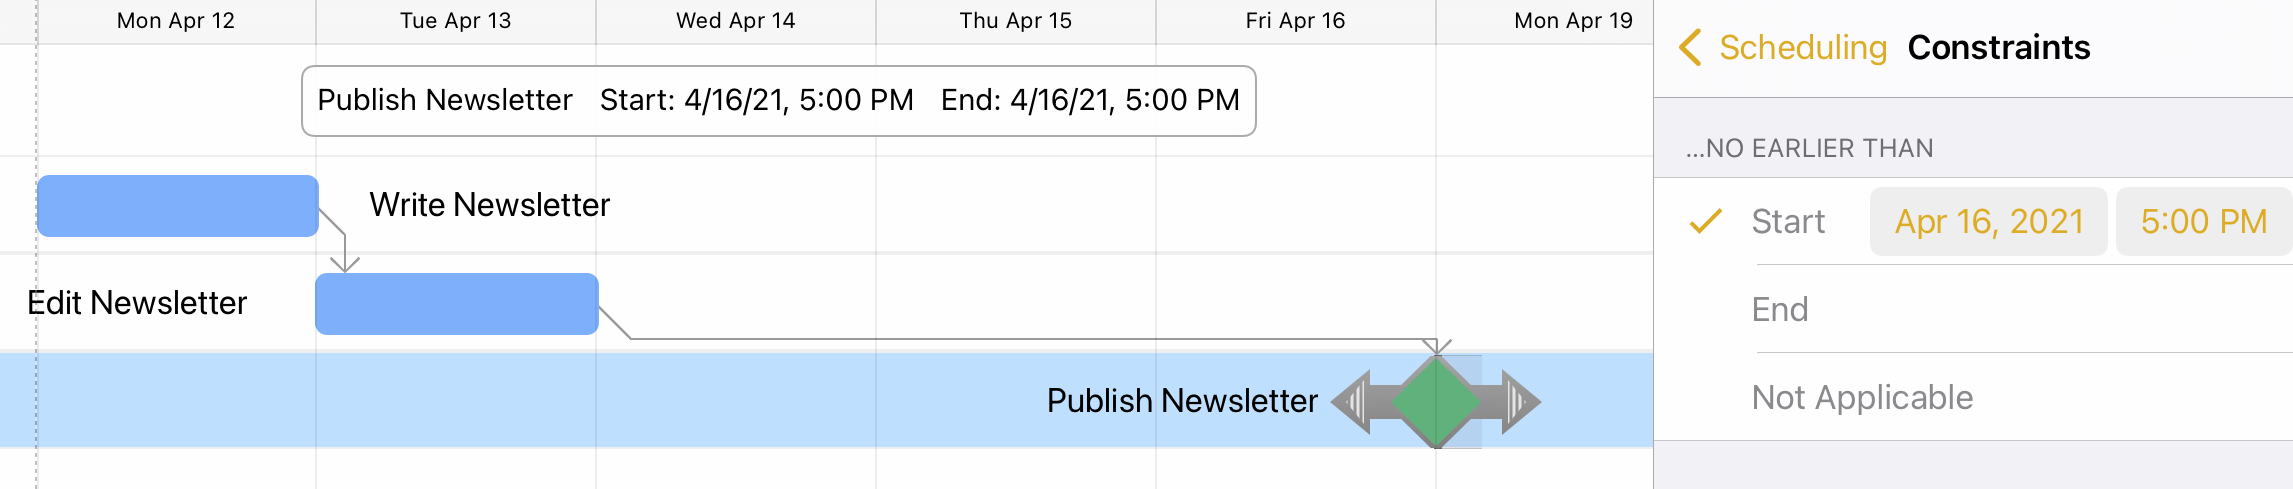
Next, we add a dependency to indicate that editing finishes when publishing starts. Because Publish Newsletter is a milestone rather than a task its start and end dates are equivalent, so this dependency is Finish > Finish (if publishing were a regular task, this would be a Start > Finish dependency instead).
Because this dependency is directional, for OmniPlan to understand the relationship you’ll want to select the milestone and drag a dependency arrow to the Edit Newsletter task rather than choosing the dependency type from the Dependents section of the Task inspector.
After creating this dependency, we delete the unneeded Finish > Start dependency from Edit to Publish to avoid creating a dependency loop.
With our dependencies set up properly, the final step in setting up our hammock task is to select it and choose Hammock as the task type from the Task inspector.
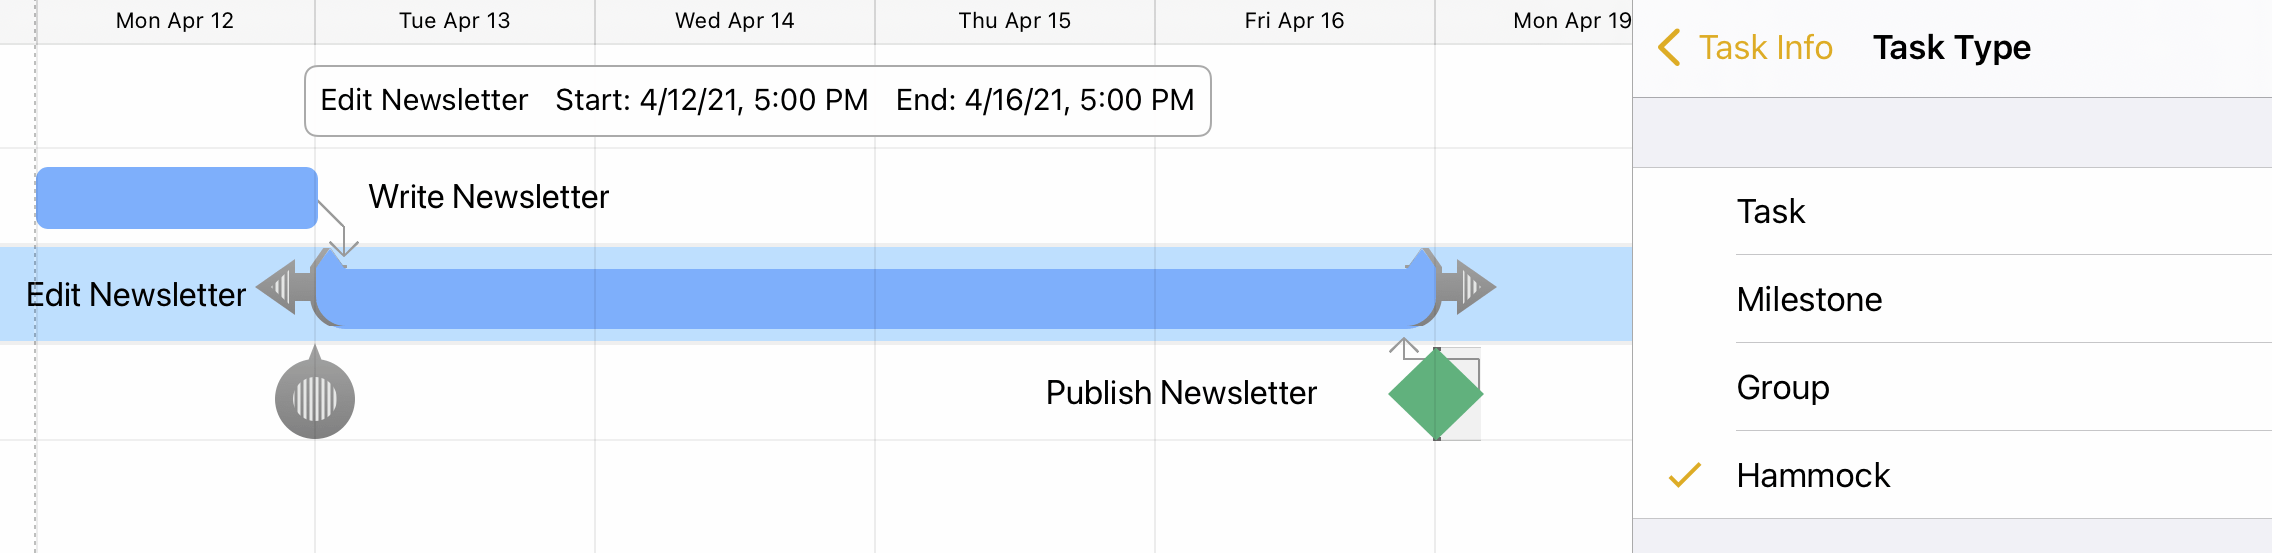
Now, if writing the newsletter takes longer than planned, the duration of the editing task will diminish to respect the needs of the tasks on either side.
Recurring Tasks
A recurring task is a task designated to repeat multiple times. This can be useful for planning weekly meetings, restocking inventory, or accounting for quarterly milestones of a project’s progress.
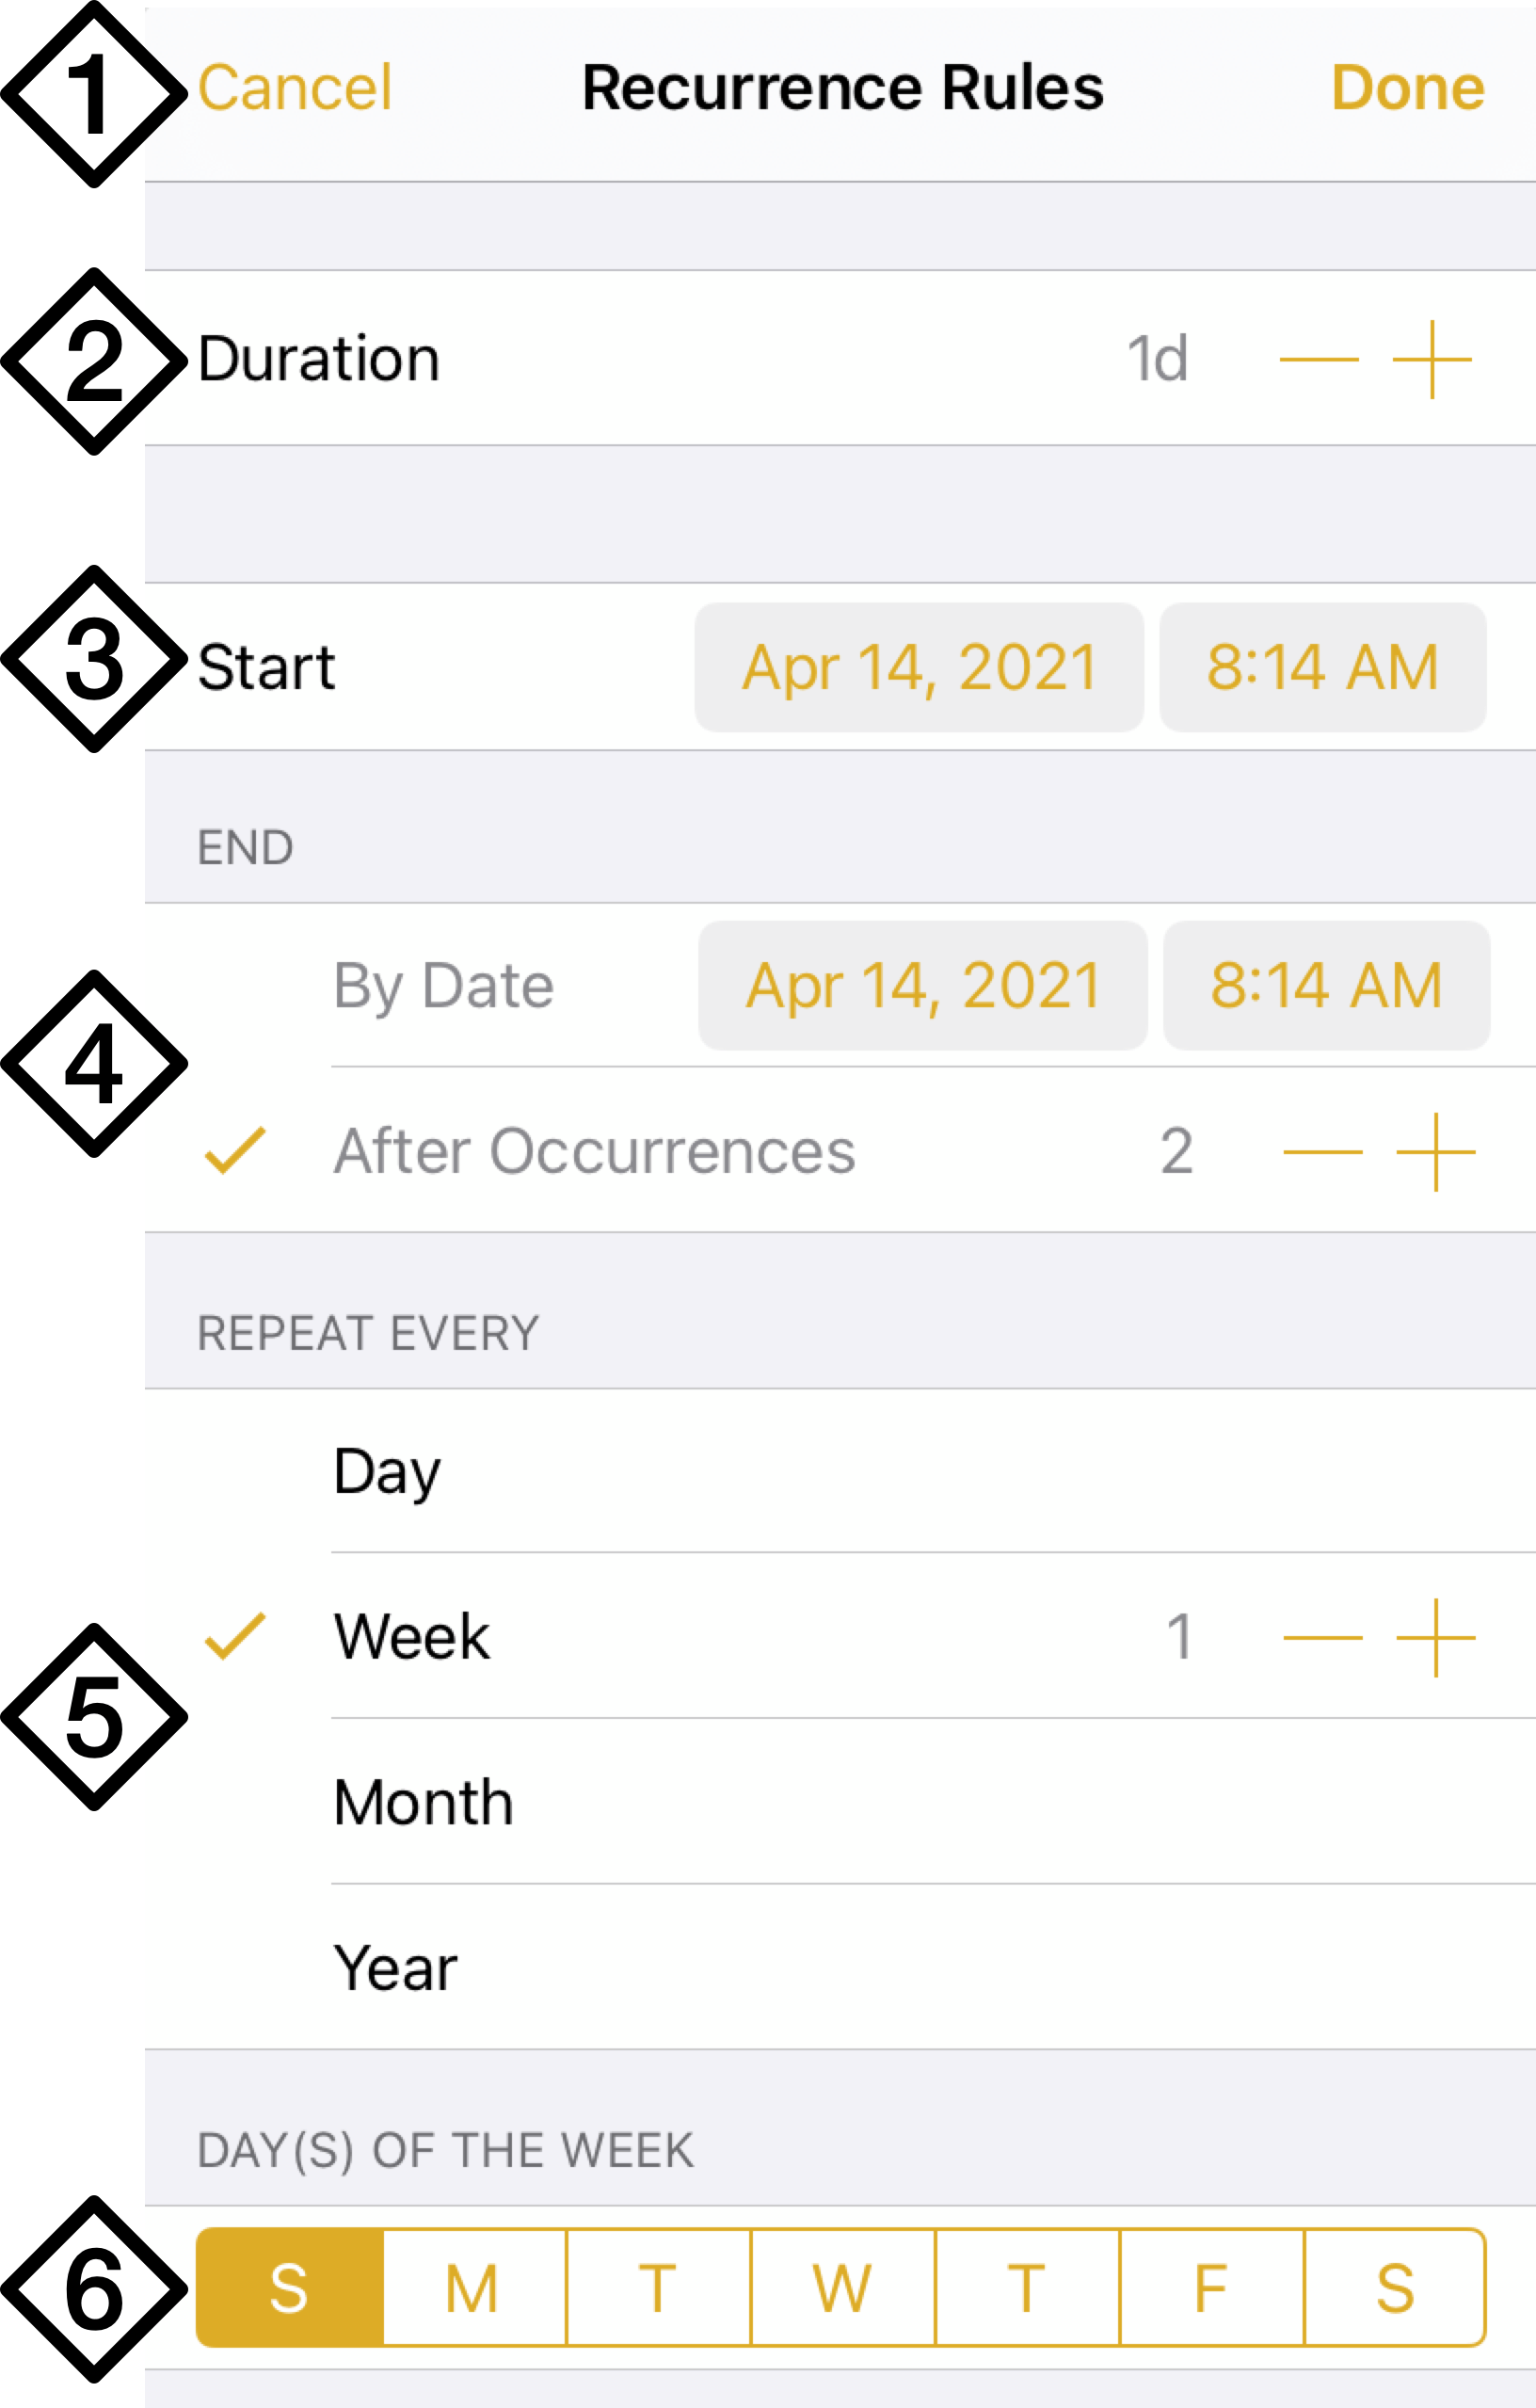
To set a task or milestone as recurring, select it and open the Task inspector. In the Task Info pane, tap Task Type and and choose Make This Task Recur. The task recurrence dialog appears for setting up the properties of the recurring task.
-
Cancel, Done—Tap to cancel any changes, or to apply them to the task.
-
Duration—Set a duration for the recurring task.
-
Start—Set a start time for the task. If the first occurrence of the repeat interval would be later than the start time, the start time changes to the first occurrence automatically.
-
End—Choose whether to end by a specific date—scheduling enough occurrences to fill the interval between start and end—or to end after a set number of occurrences.
-
Repeat Interval—Pick an interval in days, weeks, months, or years, and set a value for how many of the interval elapse between repeats.
-
Interval Details—Use these controls to refine the parameters of the chosen repeat interval. This section changes depending on whether day, week, month, or year is chosen.
Once set up, the Task Type menu changes to reflect the task's recurrence settings.
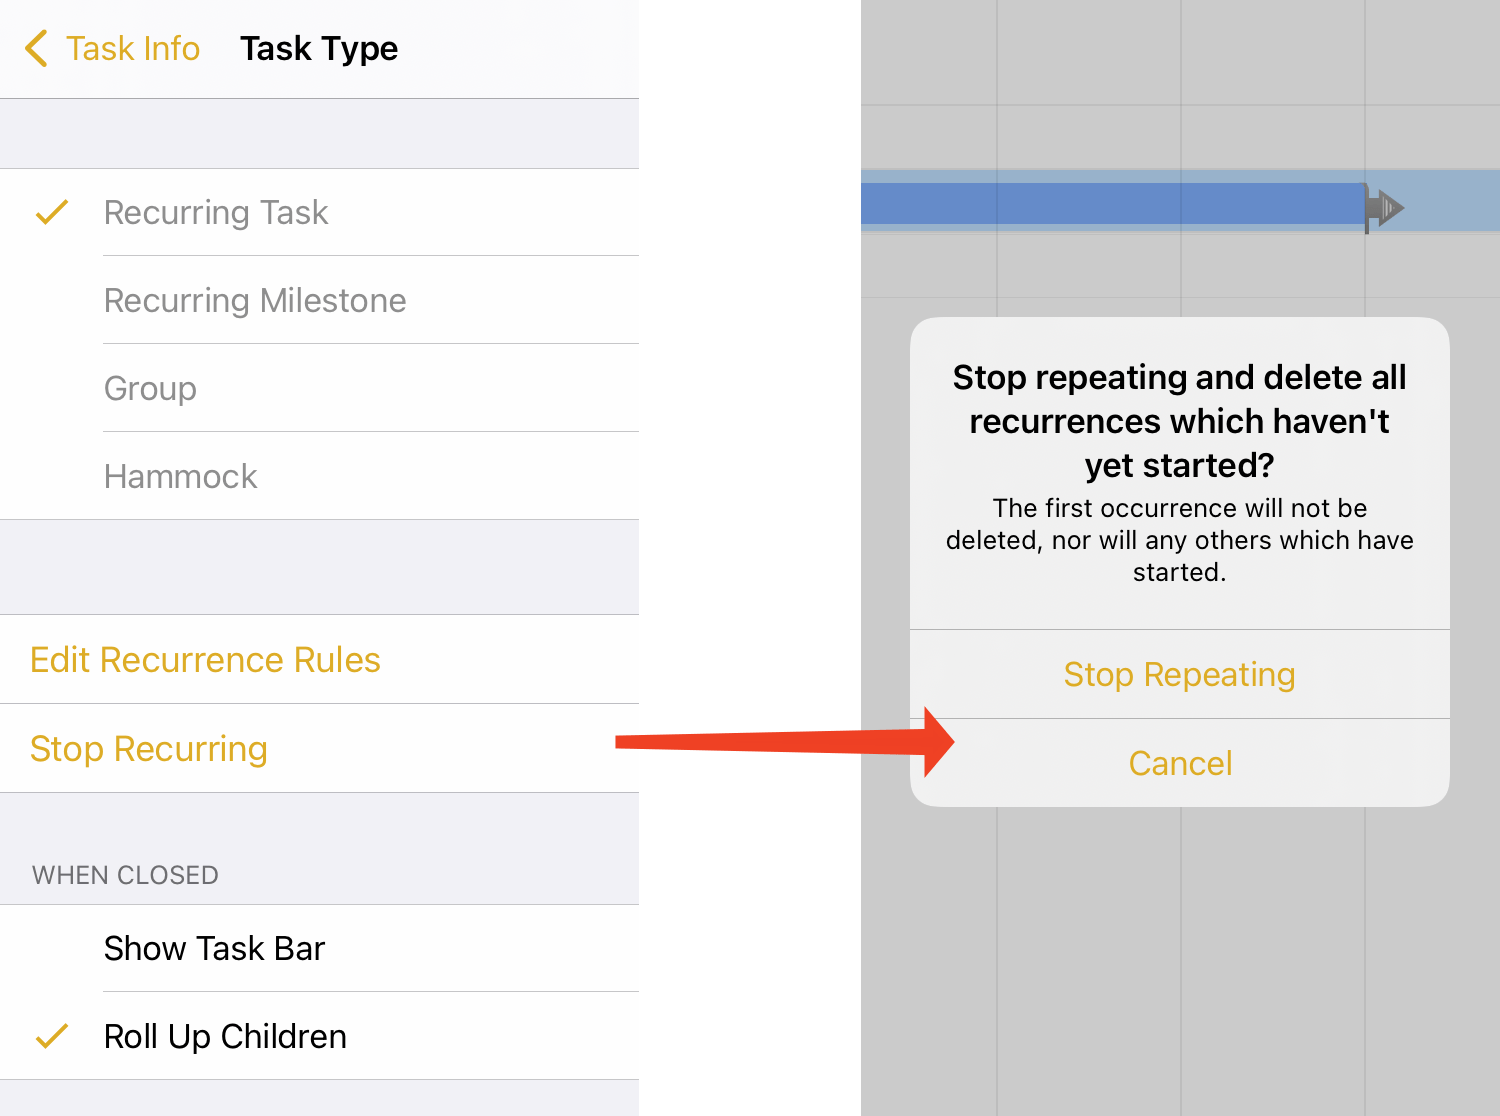
Here you can Edit Recurrence Rules, which opens the dialog to change the recurrence properties of the task, and Stop Recurring, to cancel future planned occurrences of the task. When you cancel a recurring task, past and in-progress occurrences will not be deleted.
A recurring task is represented in the outline and Gantt chart as a group task that contains each instance of the task that is scheduled to occur. You can choose how recurring task groups appear When Closed. By default they are shown with Rolled Up Children, as below:
